
Installation SecSign On-Premise Server
First Steps with your own Two-Factor Authentication Server

Find out why our Two-Factor Authentication is the best, some key-facts for developers and why you should upgrade to SecSign for your business.

Learn more about the options of on-premise use and your own customized ID App in your corporate design.

Download the plugin as cloud version for a free and convenient protection.
Table of contents
SecSignID is a Two-Factor Authentication Server you can deploy On-Premise. 2FA adds another layer of security by using a second token. In this case the physical token is your smartphone.
You have the choice for rollout-options, authentication procedure and additional safety add-ons. There is no need to worry about third party infrastructure constraints or support response times, and you maintain complete control of your data.
Questions? Feel free to get in touch with us if you need help setting up your SecSign ID plugin or to request a plugin for a not yet supported environment.
NEED HELP? CONTACT USID Server Installation Roadmap
The ID Server installation and setup is a simple and straight forward process. If this is your first time installing your On-Premise ID Server, please read the tutorial below and use the Installer, which will help you with the configuration and deployment.
Let us know if you have any questions or if you need assistance with a custom integration or feature.
Why bother? We offer a complete installation and configuration package and a ready-to-use turnkey solution.
- Determine what you need. How many user logins do you want to secure with two factor authentication? Do you need additional features or custom integrations for your environment? If you have any questions, feel free to contact us. Check out our On Premise Server page and order your custom SecSign ID Server.
- When you got your ID Server source files and want to install it yourself, prepare your environment
- Start the ID Server Java application, the Installer URL will be displayed in your terminal.
- Open the SecSign Server Installer in your browser and click through the installation steps. When you’re done, deploy the server and restart it
- Now create your first SecSign ID on your mobile device (this will be the administrator). If something went wrong, check out the trouble shooting guide
- Log into the admin center with your SecSignID to control the ID Server, check statistics etc. You can now add other users or let them subscribe to your two-factor authentication service.
1. System Overview
The highest protection for your company data, total control with your own server. An On-Premise installation of the SecSign ID two-factor authentication server offers the flexibility to connect with your preferred servers, services, and devices. You can customize the SecSign ID with your own organization’s branding and protect your data on-site.
We offer Turnkey VM, JAVA Server, Windows or Linux.
- User enters his SecSignID (can be web service, ssh tunnel or OS login) and sends an authentication request to the SecSignID Server.
- The SecSignID Server checks its database if the SecSignID exists. Optional linked user accounts include Active Directory LDAP users, Radius integration, SAML or other user management systems.
- The server checks if the SecSignID exists and is valid and returns an access symbol, which is displayed by the web service
- The SecSignID Server sends a Push Notification to the user via a 3rd party (Apple Push Notification Service or Google Push)
- The user gets a login notification and opens the SecSignID App on his mobile device. The possession of the 2048 bit protected private key (which is stored on the device) is the first authentication factor.
- The user enters his PIN code or fingerprint (which is the second authentication factor: knowledge) to access the private key and gets the login information displayed, along with four access passes
- The user taps on the same symbol he sees on the web service page and this way, confirms the two-factor authentication.
- The SecSignID Server gets the login confirmation and sends it to the web service, which in turn logs the user into the service or website.

2. Requirements
1Hardware
Depending on your infrastructure, the ID Server can run on a physical system or as a virtualization in the cloud, for example AWS. Just make sure, that the system complies with the following minimum hardware requirements:
| Components | Requirements |
|---|---|
| CPU |
|
| RAM |
|
| Disk |
|
File storage |
|
Open detailed OS -, database and file storage requirements
2OS
There are no specific requirements for the SecSign ID Server operating system, however it needs to be deployed on an environment capable of running the Java Runtime Environment. We recommend the newest stable Ubuntu Linux or a Windows Server.
3Network and Connectivity
Production Environment: The SecSign ID Server should be publicly accessible on port 443 (SSL), for the requests from web browsers and mobile devices. You need to get a domain for this interface and SSL certificates. The ID Server can be set up to obtain SSL certificates automatically via the Let’s Encrypt authority.
Testing Environment: One publicly accessible IP address is enough for testing the ID Server. If all clients and the ID Server reside in the same network, the IP does not need to be public. Please refer to the following steps to set up the environment.
3. Environment Setup
All following commands and requirements are documented for Linux Ubuntu LTS and Windows Server 2016. Other OS versions or Linux flavors are very similar to set up.
1System & OS
We recommend the newest stable Ubuntu Linux. You can also use any other Linux flavor capable of running Java applications, the newest Apple OSX or a Windows Server. The Server can run on a physical system, as a local virtualization or in the cloud, for example AWS:
2Java
After setting up the OS, the Java Runtime Environment (JRE) needs to be installed. You can download the install packages for free at oracle.
3User
We recommend creating a dedicated user ‘secsignid’, who gets all the rights to start and stop the server
4Database
Any of the following databases may be used: Apache Derby, IBM DB/2, Microsoft SQL Server, MySQL (with InnoDB Storage Engine), Oracle, PostgreSQL, Sybase/SAP. Default is Apache Derby and will be installed and configured automatically.
5Interface and Certificates
The SecSign ID Server interface handles the authentication requests from web services and the users smartphones to accept or decline the authentication.
To ensure easy and secure encrypted communication, you need to assign a domain to your server IP and create a valid SSL certificate:
6Server directory
Expand the distribution zip in a location of your choice, f.i. under /opt/, creating a directory /opt/SecSign-ID-Server. If you choose another working directory, you have to edit the start files and change the server path later. Change ownership of this directory to the user that will be running this process
unzip SecSign-ID-Server-version-N.zip -d /opt
chown -R secsignid /opt/SecSign-ID-Server
Optional non-Default
If your working directory is not under /opt/SecSign-ID-Server/ you have to adjust the starting script SecSign-ID-Server.sh (Linux) or SecSign-ID-Server.bat (Windows) to point to the desired directories.
There are four Parameters to be edited in the starting scripts:
# the username (unix user) the server is running under when started
LUSER=secsignid

# where the server lives
SERVERPATH=/opt/SecSign-ID-Server

# where to find the "java" executable
JAVA=/opt/java/jdk1.8.0_45/bin/java

### Add JDBC library  -  uncomment one of the lines below
###   [and edit to point to the correct JDBC library]
CLASSPATH=$CLASSPATH:./lib/derby.jar
Adjust the JAVA parameter according to the version of Oracle Java installed.
If you choose to use another database (alternative to the Apache Derby Database included by default) adjust the CLASSPATH parameter according to the database chosen.
4. Deployment with the SecSign Server Installer
After you have copied your files to the server directory and created the user ‘secsignid’ (like described above), it is time to start the SecSignID Server:
cd /opt/SecSign-ID-Server
chmod 755 SecSign-ID-Server.sh
./SecSign-ID-Server.sh start
- start: starts the SecSign ID server
- stop: stops the SecSign ID server
- status: current status of the SecSign ID server
- kill: kill the server w/o checking by PID (might cause unexpected behavior)
If you have Problems starting the server, check out 11. Troubleshooting. All logs and debug files are located in your working directory. Usually /opt/SecSign-ID-Server/log and /opt/SecSign-ID-Server/debug.

Find the Web Address
After the first server start, the Installer will be activated, the output of the console displays the address & port. Don’t worry, that the Server is not listening on 25100 (last line of output). We’ll change that with the installer.
Usually, the Installer binds to all available interfaces on port 28080. Use a web browser and open the Installer, for example https://ubuntu:28080 on your local machine or http://192.168.202.223:28080 on another machine inside the network if available. To find your server ip address, type ‘ifconfig’ (‘ipconfig’ for Windows) into the terminal.

Installation
In install mode, you’ll be able to tweek the settings to get your ID Server going in most standard scenarios. The Installer can create cetrificates and a Derby database automatically. The SecsignID Server will be bound to all interfaces on port 25100. This can be usefull for testing the server, fast deployment or for external/internal port mapping.
If you are looking for custom settings, just click on ‘Show Advanced Settings’ to display more possibilities to configure your ID Server
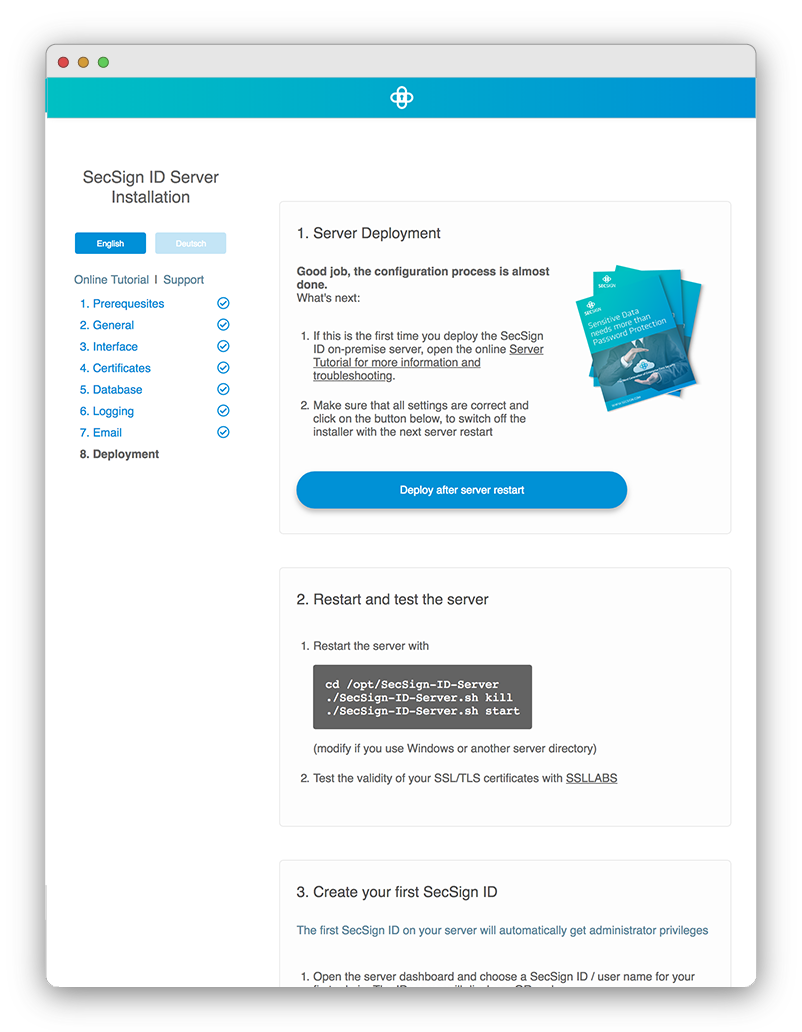
Deployment
When everything is set up, it’s time to deploy the SecSignID Server. Just click on the last option “Deploy after Server Restart”, this will deactivate the Installer.

Start the 2FA Server
Restart the Server with
cd /opt/SecSign-ID-Server
./SecSign-ID-Server.sh kill
./SecSign-ID-Server.sh start
The console or terminal should now tell you, that it is listening on the mobile port (default is 25100). If it is not listening, scroll down to 11. Troubleshooting
5. The first SecSignID with the Admin Dashboard
If your server is up and running (not in install mode), you can create your first SecSignID on your mobile app. This ID will get admin rights automatically. Following IDs don’t get any rights except locking and unlocking their ID and a profile page. To set up your admin account, do the following:

Note:
The following settings are based on our public available SecSignID Apps. If you ordered a custom app, the ID setup may be different and easier. Depending on customizations, the server URL may be preconfigured, or you have to login with your LDAP credentials to create a SecSignID. The UI might be brand specific.
To create your SecSign ID, please download and install the SecSign ID app.
We currently support Android phones and tablets, iPhones and iPads, Windows phones and Macbooks running OSX.


Open the SecSignID Dashboard
Use an internet browser and open the Admin URL, you specified earlier, for example admin.your-domain.com.
You don’t have to choose a long and complicated name, a simple easy to remember SecSignID is sufficient. After entering the ID, the login page will display a QR code.
Note: If you prefer a specific naming pattern for your users, our custom apps offer easy onboarding and custom user enrollment. Besides a company specific design or integration, there are several easy ways to set up your user accounts. For example, automatically use their Active Directory name, email address or lastname.companyX. Set up all accounts as the administrator or send user specific activation links or let your users choose a name with set prefix or suffix

Once downloaded, open the App. To create a SecSignID, on your server tap “Start QR Code pairing”.
This will open the camera app to scan the QR code.

Scan the QR Code
Hold the camera in such a way, that the whole QR Code is visible on the screen.

Follow instruction on the App and enter a 4-digit PIN to use for your SecSign ID
Your PIN will never be transmitted or stored. It will be used only to secure your private key on your mobile device.
For iPhone users the touch authentication is set on default. To use the PIN for authentication simply change the ID settings. For Android users the fingerprint authentication can be setup in the corresponding settings.

Your 2048-bit key will be generated
Just wait a second until the app creates your Key

Authenticate with your new ID
This is your SecSignID for the first admin, which is bound to your mobile device. The Server will initiate a 2FA right after creating your new ID in order to log into the dashboard. You will receive a notification (if you activated and configured) – otherwise, just open the SecSignID app and tap on your user ID. After you provide your PIN or finger print, you’ll see the access symbols. Tap the matching access symbol.This provides final confirmation that you initiated the login and completes the authentication process.
Administration
The admin area also contains your ID Server management, where you can change user details and ID status, manage user groups, PIN accounts, certificates, data processes, workflows, SSO settings, LDAP directories and see usage statistics.
It is a useful tool to handle user accounts and manage ID Server related settings.
6. User Enrollment
Easy self-enrollment for users with your specifications or you want your users to use their company ID? It’s your decision. There is no need to transfer any user data to our server. You are in control, always. You have specific requirements? Contact us for customized solutions.
Give your users the option of inline self-enrollment or bulk self-enrollment, no need for administrative guidance.
INLINE SELF-ENROLLMENT
Simply let the users generate their own ID with their next login. You have no control of what SecSignID names your users choose. This is the default setting.
BULK SELF-ENROLLMENT
Send activation links to your users. With this link, they activate their account on their smartphones and are ready to go. This is a custom function, which depends on your preferences and Identity System. This function needs to be inquired separately, contact us to learn more.
Automatic Enrollment enables you to control the ID creation process via your already setup user management system.
LINK YOUR USER MANAGEMENT SYSTEM
Your users enter their user management data and they automatically get an ID assigned. No hassle for you and your users, as easy as on-boarding gets. Perfect for predefined user names or naming patterns. A custom ID app can facilitate AD/Ldap Login and automatic SecSignID creation based on user accounts.
This function needs to be inquired separately. Get in touch to learn more about custom ID Apps.
ASSINGING AN ID
We offer several Plugins and APIs, which can handle user self enrollment. Let your users register with just their SecSignID to create a new account. Or they can login with their old username & password and additional SecSignID, to bind the ID to the user account. Alternatively, your users can go to their profile pages to set up their SecSignID.
The administrator is always able to change, update or block SecSignIDs.
7. Server Maintainance
To ensure the health of your SecSignID Server and minimize outages, we recommend the following maintainance operations:
- Serverlogs
Server logs are important to check if all components of the SecSignID server work properly, to track down authentication issues and so on. We recommend to enable logging, with a new log file every day. Finished log files can be compressed via GZIP. If you just deployed the authentication server, set the log level to EVENT or USAGE. If there are problems starting the server, use VERBOSE. Make sure to comply with any laws governing data protection and data security. - Admin Email
It is recommended, that you specify an email address for all server events, errors, warnings and server startups. If you deploy an authentication service with a fixed user base, it is also recommended to enable notifications about each new SecSign ID account. - Server Statistics
Administrators can utilize the ID-Server statistics to get more information about 3rd party websites using the 2FA Api of the ID-server. They can review the IP, device name and service URL someone used to authenticate and how many authentication sessions a web service initialized.
- Database Management
It is important to ensure fail-safe operation of the database, because it contains all information related to past and current authentication sessions, user accounts and other essential data. For critical authentication services, we recommend a fallback replicated operation behind a second hostname (see 10. Parallel, Redundant or Replicated Operation). Database backup systems can be used to distribute data across several machines to ensure fail-safe data recovery. Backups have to comply with any laws governing data protection and data security. - Software Updates
Keep the OS software up to date with the latest security patches or new stable versions. SecSignID will inform you, if there is a new ID Server version available. All updates should be installed in a timely manner to ensure the best authentication experience for you and your users.
Our specialists will take care of your On-Premise SecSignID Authentication Server
If you decide to purchase the Support Plan for Managed On-Premise, our specialists will handle initial system integration, user enrollment, updates and backups of your authentication system. A dedicated technician will take care of every step involved, to have all the benefits of an On-Premise Server without the additional overhead of integration, maintenance and troubleshooting.
8. Add Ons and additional Features
We offer a vast amount of additional features, so you can integrate your On-Premise SecSignID Server into your existing infrastructure and make secure authentication worry free – for your users and administrators. Click on the Add-Ons to discover how easy it is to enhance your infrastructure:
Sign-On
& OpenID
& VPN
Federation
Balancing
2nd Factor
App
features
Portal
SSO – Simplify Login Processes While Achieving Security Compliance
Give your users the possibility to log in with their SecSignID only ONCE to securely access all of their corporate apps and services. No risk for access to 3rd-party sites, no passwords or lost/stolen user credentials, all logins are under your control. This greatly increases productivity while keeping data secure.
With this additional feature, your users log into the admin area of your ID Server and have (beside their profile information etc.) a summary with all services, they are allowed to use. They can use an app or service with just one click. Easy integration policies ensure an effortless user and service management.
Read moreOne login to securely authenticate all your access points
Provide your users with uncompromising security and simplify the workflow. Add two-factor authentication to your local user management (Active Directory) and provide your users with easy authentication for numerous services. The SecSign ID server can readily be integrated with your active directory, LDAP or your individual user management system by using our convenient interfaces and plugins.
Control the SecSign ID naming, for example use of the company’s Email address. The information can be integrated directly from your user management system and privacy policies are enforced based on your requirements. The registration is even easier and you don’t need to worry about compliance.
Read moreThe easy way to exchange information
OAuth is an authentication protocol that allows for the interaction between two applications without revealing the login credentials. Most websites and applications offer the possibility to connect accounts with existing accounts with the standard OAuth2.0 protocol (RFC 6749).
An OAuth provider login can be secured with the SecSignID two-factor authentication and your On-Premise ID Server can also act as the provider itself.
Read moreSecure VPN access and AD User Management
Use SecSign ID to enable two factor authentication on your Windows Server with an easy and highly secure user login using iOS or Android mobile devices.
Or deploy a Cisco ASA firewall device, which offers a coordinated combination of hardware, hardened operation system and firewall software. It implements an encrypted remote access to company applications and shared resources via for example SSL or IPsec. SecSign ID can be integrated in the existing system and offers secure two-factor authentication for your VPN service.
Identity Federation
Use your local Active Directory for authentication at cloud services and secure access with our SecSign ID on-premise Two-Factor Authentication server.
The authentication is redirected via the Active Directory, secured with your on-premise SecSignID server. The authentication takes place on the local ID server. That way all user can be managed and controlled local in the Active Directory. No sensitive data is ever transmitted to the cloud service.
Enforce mandatory company-specific regulations and standards for every login and monitor access rights. Secure two-factor Authentication for ALL logins. Self-enrollment, Automatic Enrollment or Administrative Enrollment makes it easy to integrate.
Read moreFallback Servers and Load Balancing
For reliability and fail-safe operation it is possible to run more than one instance of the SecSign-ID-Server parallel, either with redundant servers behind a single hostname or with replicated server.
A Load Balancer can distribute traffic and control the individual server workload. Critical services with high peak requests can utilize a dynamic cluster of virtual machines to adjust to changing server and network requirements
Custom 2nd Factor
Besides the available PIN code and fingerprint authentication, we offer a variety of custom second factors to fit your company’s needs. Utilize SMS messages, security cards or tokens, face recognition, vein or iris scanners and so on.
Get in touch to find out, if we can deploy and integrate your custom 2nd factor.
Contact usCustom App
Maximize user compliance and reduce expenses with customized onboarding and self enrollment with your on-premise SecSign ID server. We develop your Two-Factor Authentication app in your corporate design based on your vision – Maximum brand recognition for your customers.
SecSignID can also be integrated into existing iOS / Android / OSX / Windows Apps. We offer a SDK to easily integrate your on-premise authentication service.
Custom intergration and functionality requests
You have special requirements for your authentication service? We will be by your side, to utilize other authentication factors or integrate the SecSignID into custom environments and systems. Get in touch, to discuss your specific requirements.
Contact usSecSign Portal: Secure communication and file exchange
The highest protection for your company data, total control with your own server. Exchange of large files and messages, digital signatures and more – always encrypted and protected with Two-Factor Authentication. It’s like Email, just better: Encryption on all levels, truly secure user authentication, no spam, unlimited sized files, cloud sharing and collaboration. Your individualized portal with your logo, your URL and company branding. With the SecSign Portal you can collaborate with other users, sign and share legal documents.
Compliance with international and national regulations, legally binding signatures and applications for both companies and private users. Implement advanced or qualified (QES) signatures and design your workflows to comply various regulations (eIDAS, FDA, …).
9. Parallel, Redundant or Replicated Operation
For reliability and fail-safe operation it is possible to run more then one instance of the SecSign-ID-Server parallel, either with redundant servers behind a single hostname (sharing the same database) or with replicated server. Both methods can also be combined.
Redundant operation behind a single hostname (local redundancy)
After successful configuration and operation start of the first instance, simply start another or several copies of the first SecSign-ID-Server instance, all accessing the same database (completely duplicating the configuration of the first instance, optionally changing ports or hostnames as required). It is also possible to use a load balancing router behind the single public-hostname to distribute requests across the multiple SecSign-ID-Server instances. For optional additional database fail safe operation you may also use a database cluster (adjusting the secpkidb.URLProtocol property accordingly, as required for the specific database).
Redundant “fallback” replicated operation (both local and remote redundancy)
Both the first and the remote (fallback) sites may use local redundancy with multiple SecSign-ID-Server instances and load balancing router or also cluster database instances.
Fallback Replicated operation behind a second hostname (remote replication)
As protection against complete failure of the computer center or its internet access, you may choose to install a ‘fallback’ replicated SecSign-ID-Server at a remote site. This will use its own independent database and will be automatically found by the mobile devices if the host names follow the naming rule described below. This will allow the use of the safe encrypted replication provided by the SecSign-ID-Server over the public internet.
1 – After successful configuration and start of the first instance, install a copy of the first instance at a second remote site accessible through a second public hostname and using another database instance.
2 – At the remote site, start the installer, go to manual installation and adjust the database settings (or edit it in SecSign-ID-Server.properties). Deploy & restart.
3 – Start the installer at the first instance, go to manual installation and adjust the fallback server settings in the tab “6. Advanced” to something like id2.public-domain-here.com.
Alternately, you can edit the parameters seccommerce.secappserver.0 and seccommerce.secappserverport.0 in SecSign-ID-Server.properties. Additional fallback SecSign-ID-Server instances can be installed at further remote sites and configured using “seccommerce.secappserver.1” and so on.
In order for the mobile devices to automatically find the fallback server (in case the access to the first instance fails), the public domain name should be defined according to a simple naming rule as in the example:
id1.public-domain-here.com (main SecSign ID Server)
id2.public-domain-here.com (fallback Server)
id3.public-domain-here.com (second fallback Server)
At the mobile device SecSign-ID-App the user only needs to configure the first hostname, the App will determine alternative name when the access to the first instance fails and automatically try to access the other hostname.
10. Troubleshooting
Installation
Server Start Errors
Here is a list of what can go wrong during server start. All Error Messages will be displayed at the terminal or console and saved in the logs:
ID App Errors
Here is a list of what can go wrong setting up your (first) SecSignID. All Error Messages will be displayed in the iOS/OSX/Android/Windows App:
Keywords: two-factor authentication, 2fa, SecSign ID, Cisco, ASA, VPN, ASDM, ESXi
11. Available APIS
We provide an ever growing list of APIs and plugins to easily integrate the SecSign ID Two-Factor Authentication in any project. An overview is available at Plugin and APIs.
We do not only offer APIs in different programming languages but also plugins for CMS, Server and VPN environments, oAuth2 and many more. These plugins use our APIs and offer additional functionalities, for example user management, easy and native installation, logging or integration in firewalls or Active Directory.
The JIRA plugin for example uses the JAVA-API. The PHP-Api and JS-API is used by WordPress, Joomla, Drupal, Typo3 and many more. The ASP.net/C#-API is used for the Windows and Cisco VPN and the C-API is used for protecting Unix SSH services. The Objective-C API is used by our AppleTV and iPhone/iPad apps.

12. See for yourself
You can experience the SecSign ID two-factor authentication and the two-factor login by simply integrating the plugin into your website or test environment. Or you can try out the login process on our website without having to register first. You already have a SecSign ID or you want one? Login now and use the portal or use our hassle free registration.
See for yourself how fast and convenient the login process using challenge-response authentication with 2048-bit key pairs is. There is no need for passwords, and no passwords or other confidential information are ever transmitted. It is easy to integrate and simple to use.
For more information about the patented SafeKey procedure and it's unique security can be found here.
If you are missing an API for the programming language you are working with, feel free to contact us and we’ll find a solution with you. If you need help with the integration into an existing system or you can’t find the plugin for your content management system you are working with, don’t hesitate to contact our support team.
Your own ID-Server
On premise installations of SecSign ID offer the flexibility to connect with your preferred servers, services, and devices. And you can customize the SecSign ID with your own organization’s branding.

Why upgrade to SecSign?

On-premise or in the cloud
Choose between our SecSign ID Cloud or operate your own on-premise Two-Factor Authentication server.

Easy customization
Operate your own YourBrand ID app - Two-Factor Authentication customized to your needs.
Ready-to-use SDK
Integrate SecSign ID Two-Factor Authentication in existing apps with our ready-to-use SDK.
Easy user management
Use the Two-Factor Authentication Server to secure your company Active Directory/LDAP. Your own Identity and Access Management System, for example for mandatory updates and additional security features.

Cover all logins
Integration in any login environment: web, local, VPN, remote desktop, mobile logins and many more.

Plugins for all your needs
No need for complex integration: we have plugins for almost all environments.
Contact Us
Sales
Want to learn more about SecSign’s innovative and highly secure
solutions for protecting your user accounts and sensitive data?
Use our contact form to submit your information, and a SecSign sales representative will contact you within one business day.
Product Support
If you need assistance with an existing SecSign account or product
installation, please see the FAQs for more information on the most common questions. You don’t find the solution to your problem? Don’t hesitate to contact the
Product Support
I am Interested in