


Your own ID-Server
On premise installations of SecSign ID offer the flexibility to connect with your preferred servers, services, and devices. And you can customize the SecSign ID with your own organization’s branding.
Learn MoreThe following tutorial describes the configuration to use the SecSign ID Two-Factor Authentication with RADIUS.
The SecSignID 2FA authentication overview for RADIUS:
When your users login, they usually authenticate with user name and password first. After that, the second factor will be requested. So how does the mapping of user name and SecSignID work?
You have several options to assign a SecSign ID to a user:
Please contact us, if you do not want to modify Active Directory user profiles. We offer ID – Username mapping with our on-premise SecSignID server. Mapping via text file is not recommended but possible.
1. Java VM
As the SecSign ID RADIUS proxy is written in Java it can be run on any operating system with Java support like for example Windows or Linux. So the first step of the installation is to install a recent Java virtual machine preferable with 64 bit available at Oracle’s web site.
2. SecSign ID RADIUS proxy files
The directory SecSignIDRadiusProxy contains the application code in a JAR file and its configuration file. This directory has to be copied to the system that shall run the SecSign ID RADIUS proxy.
3. Setup Environment
We assume, that you already have a working setup, where a VPN (or other service) utilizes RADIUS to validate user credentials against Active Directory.
To integrate the SecSignID RADIUS Proxy, we have to change the endpoints. The VPN server already got the RADIUS server address, which needs to be changed to the RADUS Proxy address.
The Radius server already got the client configuration of the VPN server. The only client the RADIUS server needs to know is the RADUS Proxy.
The VPN and RADIUS server do not need to know each other, they just need to know the Radius Proxy, which sits in between the two
The configuration file secradiusproxy.properties needs to be edited:
The default port number of RADIUS is 1812. If necessary, if different value may be set here:
secradiusproxy.radius.port=1812
If the SecSign ID RADIUS proxy shall only bind to a specific IP address it may be specified here. The default is to bind to all IP addresses the machine has.
secradiusproxy.radius.bind.address=10.4.0.1
For each RADIUS client (for example a Microsoft Windows Server) the proxy needs to know the IP address and the shared secret. The list of RADIUS clients starts with the index ‘0’ and may have any number of entries which are consecutitvely numbered.
secradiusproxy.radiusclient.0.host=10.3.0.1
secradiusproxy.radiusclient.0.sharedsecret=theSecretClientValue
The proxy also needs to know where to forward the RADIUS access requests for validation of the primary authentication credentials (user name and password). This forward RADIUS server may be for example another Microsoft Windows Server or even the same as the RADIUS client.
secradiusproxy.forwardradiusserver.host=10.5.0.1
secradiusproxy.forwardradiusserver.port=1812
secradiusproxy.forwardradiusserver.sharedsecret=theSecretServerValue
For each Windows user whose log-in shall be secured in the SecSign ID the Active Directory must contain an attribute containing the SecSign ID user name of this user. The proxy uses an LDAP connection to query the SecSign ID user name in the Active Directory. For this LDAP connection it needs the name and password of a technical user with read access to the users branch of the Active Directory. Furthermore, the base DN will tell the proxy where to find the users branch in the LDAP tree. The recommended full name of this technical user is SecSign ID Radius Proxy and its descrption: Technical user to allow AD LDAP queries for the SecSign ID RADIUS proxy.
secradiusproxy.activedirectoryldapserver.host=10.6.0.1
secradiusproxy.activedirectoryldapserver.port=389
secradiusproxy.activedirectoryldapserver.username=DOMAIN\\radiusproxyuser
secradiusproxy.activedirectoryldapserver.password=123456
secradiusproxy.activedirectoryldapserver.usersbasedn=CN=Users,DC=domain,DC=com
The proxy will keep a copy of each received RADIUS packet for a certain time in order to recognize duplicate packets. The proxy will also remember the Windows user names for whom it is waiting for the completion of the SecSign ID log-in. The proxy will not start a new log-in session for such users if requested by the RADIUS client. The time out for both list entries can be specified here.
secradiusproxy.receivedpackets.cleanup.seconds=60
secradiusproxy.currentwindowsusers.cleanup.seconds=60
In order to initiate a SecSign ID log-in the SecSign ID RADIUS proxy needs the host name of the SecSign ID server and optionally of fallback SecSign ID servers:
seccommerce.secappserver.0=id1.secsign.com
seccommerce.secappserverport.0=443
#seccommerce.secappserver.1=localhost
#seccommerce.secappserverport.1=25200
The connection to the SecSign ID server is TLS encrypted. Therefore, a DER encoded trusted certificate of the SecSign ID server may be configured. If the server uses a certificate issued on its official DNS name by a regular trustcenter this configuration entry is not necessary.
seccommerce.secappservertlscert.0=trustedServerCert.der
A timeout value be set after which the proxy tries to send its request to the next fallback SecSign ID server:
seccommerce.secappserver.connecttimeout=5000
The SecSign ID RADIUS proxy may use a HTTP proxy to send requests to the SecSign ID server. The HTTP proxy has the following settings:
seccommerce.secappserver.proxy.server=proxy.sec.intern
seccommerce.secappserver.proxy.port=3128
seccommerce.secappserver.proxy.username=
seccommerce.secappserver.proxy.password=
If certain hosts can be reached without the general HTTP proxy they can be named here:
seccommerce.secappserver.proxy.bypass.0=www.available.direct
seccommerce.secappserver.proxy.bypass.1=need.no.proxy
The SecSign ID RADIUS proxy may write a log file. It contains all messages whose severity is equal to or above a specified level.
log.fileactive=on
log.filename=secradiusproxy.log
log.dir=.
log.maxlogtype=50
The levels are:
The proxy may begin a new log file each day:
log.filenamealter=on
The proxy can be started with:
java -classpath SecSignIDRadiusProxy.jar seccommerce.radius.RadiusProxy secradiusproxy.properties
The proxy will output messages like:
30.07.2015 15:21:34:696 main: Log messages to '.' with level 50 according to radproxy.fz
open logfile /SecSignIDRadiusProxy/./secradiusproxy30.log
30.07.2015 15:21:34:774 main: SecPKI host 0 = id1.secsign.com:443
30.07.2015 15:21:34:774 main: seccommerce.secappserver.1 not set in properties file. Failover configuration finished with 1 SecPKI hosts.
30.07.2015 15:21:34:785 main: Data format to SecPKI = serialized Java objects
30.07.2015 15:21:34:786 main: TLS to SecPKI = true
30.07.2015 15:21:34:786 main: WARNING: No SecPKI server trusted TLS certificate configured.
30.07.2015 15:21:34:788 main: Init SecPKI API: First server id1.secsign.com:443, First trusted TLS certificate: null
30.07.2015 15:21:34:788 main: Set SecPKI connect timeout 5000 ms
30.07.2015 15:21:34:790 main: SecPKIApi version 6 Build 1
30.07.2015 15:21:34:790 main: java.version=1.6.0_65
30.07.2015 15:21:34:790 main: Number of servers configured = 1
30.07.2015 15:21:34:794 main: RADIUS proxy server listening at 0.0.0.0:1812
Pressing ^C in the terminal window will end the proxy.
The SecSign ID RADIUS proxy can be used with different systems that support RADIUS. As an example the following section shows how to configure the SecSign ID RADIUS proxy in a Microsoft Windows Server 2012.
In the Server Manager the option Network Policy Server in the Tools menu will open the configuration of the Network Policy Server. A new RADIUS server can be added at the node NPS (Local) – RADIUS Clients and Servers – Remote RADIUS Server Groups. There, in the context menu the option New opens the following dialog in which a RADIUS server group with a name like SecSign ID RADIUS proxy group may be created:

The button Add shows a dialog in which the IP address or host name of the SecSign ID RADIUS proxy can be added:

The shared secret has to be entered in the Authentication/Accounting tab. It must be identical to the value of secradiusproxy.radiusclient..sharedsecret in the configuration file of the proxy.

In the Load Balancing tab it is necessary to set the Number of seconds without response before a request is considered dropped to at least 60 seconds. This time allows the user to perform the SecSign ID authentication on his smart phone. The SecSign ID RADIUS proxy cannot answer the RADIUS client before the SecSign ID log-in is completed.

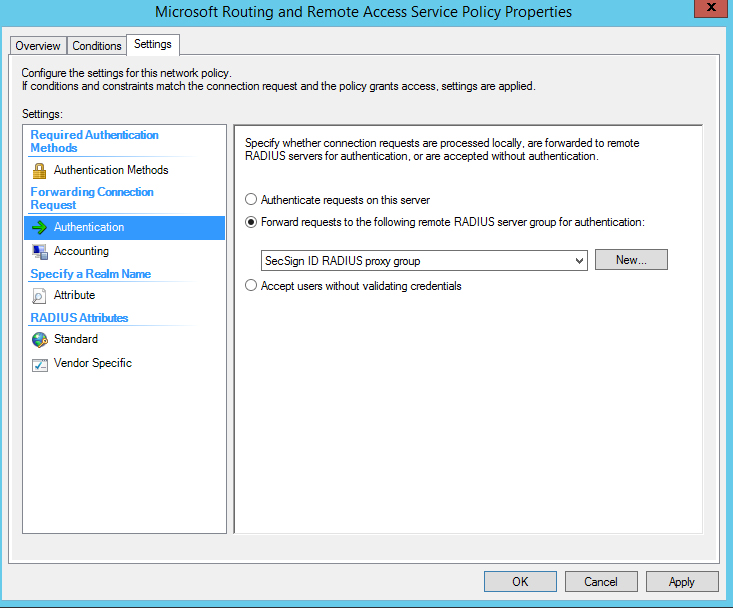
Now, the Microsoft Network Policy Server will be configured to send RADIUS requests to the SecSign ID RADIUS proxy in case of for example a VPN log-in: Selecting the node NPS (Local) – Policies – Connection Request Policies shows the following dialog:

A double click on Microsoft Routing and Remote Access Service Policy displays a dialog in which the tab Settings has to be selected. The node Forwarding Connection Request – Authentication allows to determine that RADIUS requests shall be forwarded to the SecSign ID RADIUS proxy:
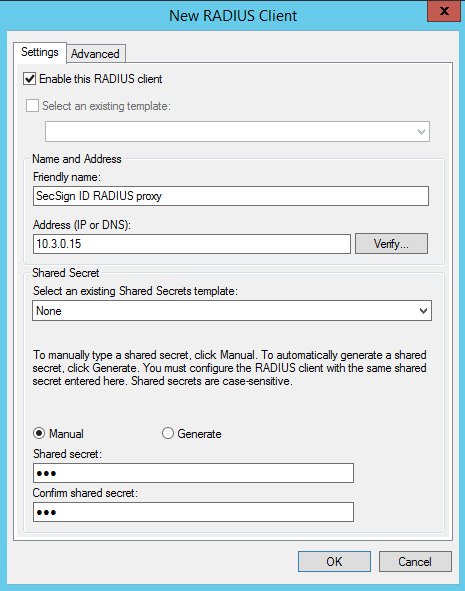
The SecSign ID RADIUS proxy can forward RADIUS requests to different systems that support RADIUS. As an example the following section shows how to allow the SecSign ID RADIUS proxy as a RADIUS client in a Microsoft Windows Server 2012.
In the Server Manager the option Network Policy Server in the Tools menu will open the configuration of the Network Policy Server. A new RADIUS client can be added at the node NPS (Local) – RADIUS Clients and Servers – RADIUS Clients. There, in the context menu the option New opens the following dialog in which a RADIUS client with a name like SecSign ID RADIUS proxy may be created.
The IP address or DNS host name is the one of the machine running the SecSign ID RADIUS proxy. The shared secret is the same which was specified as secradiusproxy.forwardradiusserver.sharedsecret in the configuration file of the proxy.
If the SecSign ID RADIUS proxy is integrated into a Microsoft Windows Server infrastructure it can be used to secure for example the log-in of a Windows 8.1 VPN client with SecSign ID.
To create a VPN connection using Microsoft Windows 8.1, open the Windows Control Panel and then the Network and Sharing Center. Select:
In this example, the Internet address of the VPN target is win2012r2.secsignersde.com and the destination is described by the name: „VPN with SecSign ID“

Pressing Create opens the Windows side bar showing all connections. Selecting VPN with SecSign ID and clicking on Connect opens a password entry asking for the Windows user name and password having an account at the VPN target:


When Window 8.1 says Verifying your credentials, please authenticate the log-in in the SecSignApp on your smart phone.
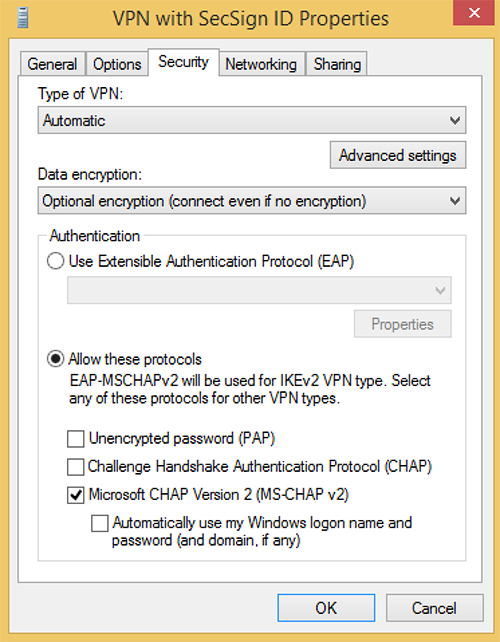
If desired, the authentication methods for the VPN connection can be changed in the network adapter settings in the Network and Sharing Center of the Windows Control Panel. The SecSign ID RADIUS proxy supports the authentication methods MS-CHAP v2 and PAP:
On premise installations of SecSign ID offer the flexibility to connect with your preferred servers, services, and devices. And you can customize the SecSign ID with your own organization’s branding.
Learn More
We are happy to announce that the SecSign ID server has passed the official FIDO certification program of the FIDO Alliance. This will allow you to use the complete FIDO2/WebAuthn standard for passwordless 2FA sign-ins in your exi ...
Mehr LesenThe FIDO2 Project is a set of standards developed by the FIDO Alliance and the World Wide Web Consortium (W3C) to create a strong authentication protocol for the web. It consist mainly of the WebAuth standard for the browser part ...
Mehr LesenIn the recent weeks, home office work has increased potentially. And while employees are practicing social distancing from their home computer, attackers are working hard to exploit security issues in this situation that is unfami ...
Mehr LesenWant to learn more about SecSign’s innovative and highly secure
solutions for protecting your user accounts and sensitive data?
Use our contact form to submit your information, and a SecSign sales representative will contact you within one business day.
If you need assistance with an existing SecSign account or product
installation, please see the FAQs for more information on the most common questions. You don’t find the solution to your problem? Don’t hesitate to contact the
Product Support
I am Interested in